


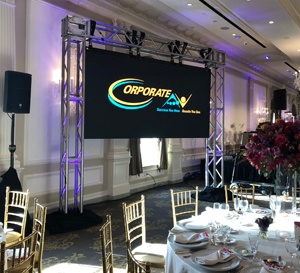
What better to serve as the finale of our backdrops series than one of the most visually impressive options available: the video wall. In the world of AV production, the video wall is a hot commodity, and constantly developing. Its flash and impact are truly enticing, and it does act as a massive canvas for design to fit most aesthetics. Whether you’re trying to ‘wow’ your guests at a fundraiser in hopes that they’ll reach a little deeper into their pockets, or to fire up a national sales team to reach their goals in a new quarter – video walls are a potent option.
If you haven’t already, we’d recommend starting at part 1 and working your way up – the other options are less complex: Colored Drape, Modular Options, or Fabrics will all likely be simpler to plan for and less expensive. But if your event needs a backdrop that really delivers, video walls are the way to go. In this final installment we’ll touch on a few general points in order to help make this technology more accessible, and provide some surface-level understanding to aide your initial discussions. Just note, we are simplifying things quite a bit here – there are a wide array of products with advantages and disadvantages, suited for all kinds of applications. We recommend starting with a basic understanding of them and how they might help reach your goals, and let your technology partner guide from there.
Size
First off, the term video wall is often used loosely. For example, the extra large, elongated, or otherwise unconventionally shaped projection screens or surfaces are really part of a different category, and so we’ll exclude that here. Video walls are generally comprised of a framework of smaller screens (or tiles) that combine to make one larger image; and while they have a similar application to their projection counterpart, there are a totally different set of options and parameters.
One of those parameters is sizing: tile size and bezel size to be specific. The tile size is self-explanatory – how big each of the building blocks are and what dimensions they have. For the most part, all that boils down to is determining how many tiles you need to create the desired backdrop size. Cost will most often be the determining factor there, but visual content will also have an impact, since it will have to be created to fit the dimensions and resolution of the video wall exactly.
 There’s also bezel size to consider. This refers to the border (if any) around the individual tiles that make up a video wall. If you think about your home television – most will have just a thin strip of metal or plastic surrounding the outer edge of the viewing area. If you were to join two of those TV’s together side-by-side, the space between the screens would be quite noticeable! You can create a video wall out of televisions; you’d just need to consider how thick that space between the screens (bezel) would be, and any visual content would need to be formatted to account for that. The bezel can get thinner and thinner which will usually correlate with higher cost, and eventually to no bezel, creating one nearly seamless surface.
Pixel Pitch
Arguably even before general size, the pixel pitch is a critical detail to determine the best fit for your goal. If you can think of a TV image as just a bunch of colored dots that make up a larger image, then each of those colored dots would be the pixels. Pixel pitch just refers to how much space there is between each of the pixels. Just like a mosaic that doesn’t look like much up close, take a few steps back and you’ll start to see the image. Get far enough away and you’ll forget it’s even made up of those individual pieces.
 Video walls are very similar, and different products will offer bigger or smaller pixel pitches, which will impact both what type of content can be displayed, and how close your audience can be to it. Certain products are really only intended to serve as a lively backdrop – colors, patterns, basic text, and other aesthetic elements can be displayed – but not the PowerPoint presentations, photos, or videos you might need to present to your audience. For that, a much smaller pixel pitch is needed, and you can expect the cost to rise as the pixel pitch drops.
Just like the mosaic, how close your audience will be to the video wall can matter just as much. If there’s a significant distance between your backdrop and the first row of seating, you’ll have a little forgiveness with how small your pixel pitch is, and vice versa if your audience is close by. The balance between type of content and distance from audience (and cost) will dictate your pixel pitch in the end.
Time & Money
The last thing to note about video walls is the expenditure – both time and money. If your current budget is tight and your backdrop is more aligned with Part 1 or Part 2 of the series, you may want to save yourself the time – video walls have significant costs, which scale up very quickly. There are internal costs: time spent by design teams creating visual content specifically catered to your video wall; and external costs: rental of high-end equipment, as well as the time spent onsite building. It’s also important to note that dealing with more advanced technology requires particular skillsets from your onsite video engineers. These professionals are generally more experienced, knowledgeable, and thereby costly, so you should expect an increase both in both equipment and staffing.
That all said, it doesn’t hurt to ask questions to gauge whether or not it can fit in your event budget, and arming yourself with a basic understanding will help you get to actionable information much quicker. Video walls can create a truly immersive experience when done well, and will only continue to get more common. And as is the case with all new technology, it’s only this impactful now – that is to say, until the next advancement comes along.